Labels
给网络模型的不同部分定义标签可以让我们很方便的进行查询操作,例如在后面的算法里需要定义边界条件。生成网络时,网络模型会自带一些相关标签。也可以添加自定义的标签。本教程将介绍标签的工作原理、如何添加标签以及如何使用标签。
使用网络模型自带的标签
先创建一个简单的网络模型:
import openpnm as op
import numpy as np
op.visualization.set_mpl_style()
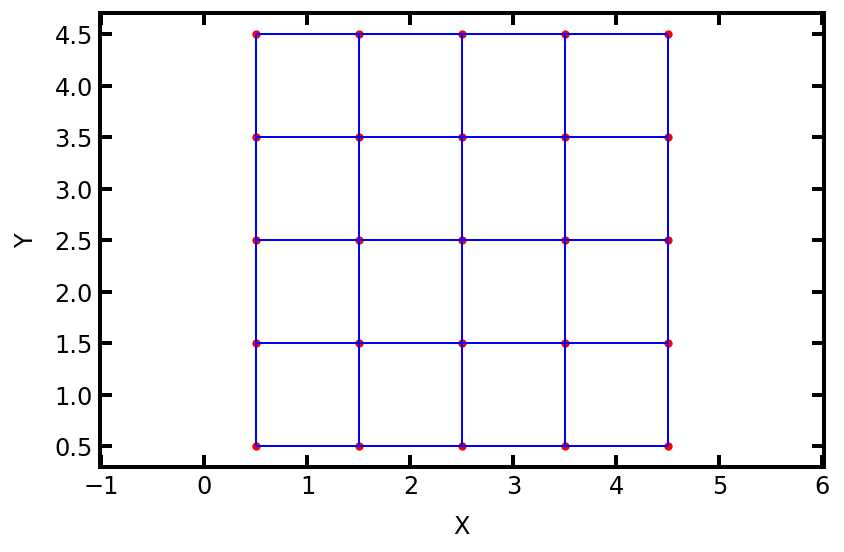
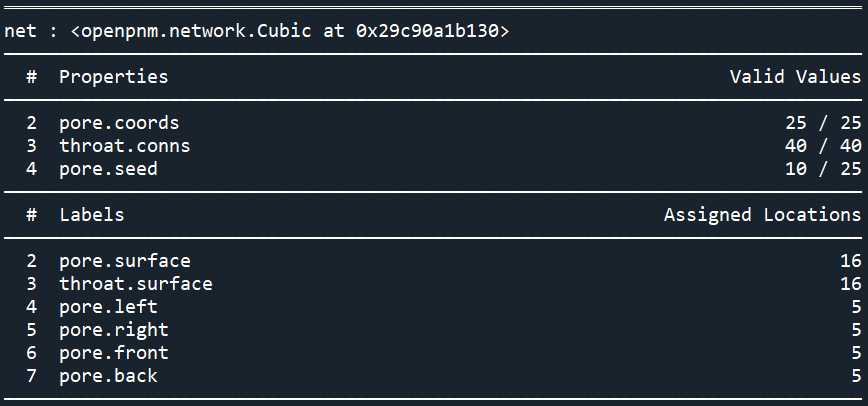
pn = op.network.Cubic(shape=[5, 5, 1])
ax = op.visualization.plot_coordinates(pn)#将pore可视化为点
ax = op.visualization.plot_connections(pn, ax=ax)#可视化流道为线
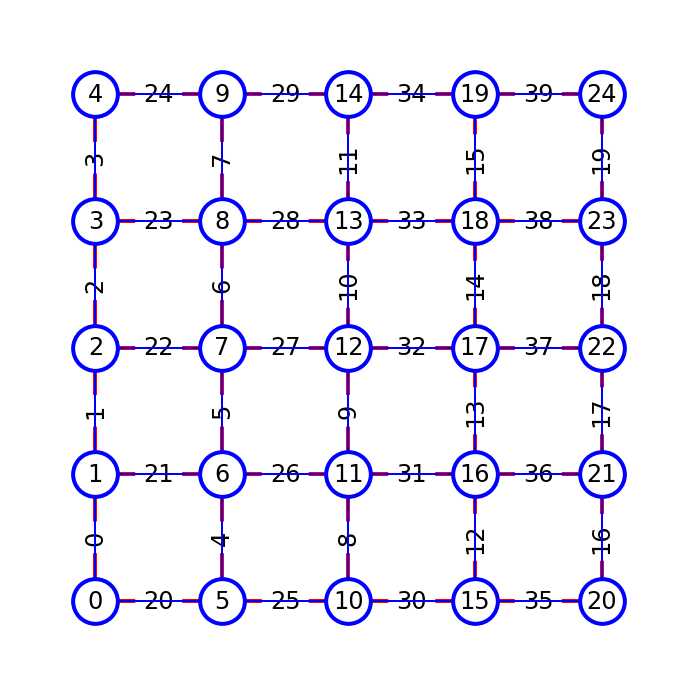
op.visualization.plot_tutorial(pn);
print(pn)
通过可视化函数和print函数直接查询网络模型的相关信息
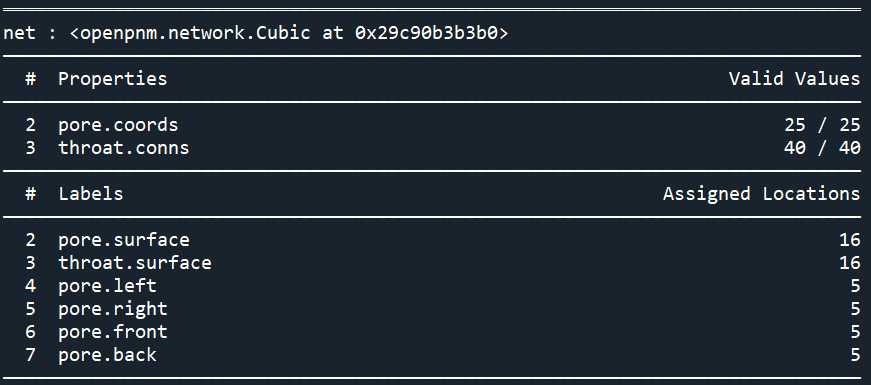
在上面的输出中,我们可以看到2个“属性”,以及6个“标签”。OpenPNM之前的教程里提到过,OpenPNM中所有对象的都是以键值对的方式储存,属性的值是int类型的数组,标签的值是bool类型的数组,数组的长度是Np或者Nt,标签“pore.left”清楚地表明了网络“左侧”的孔。我们可以直接检查标签数组
print(pn['pore.coords'])
print(pn.Ps)
print(pn['pore.left'])
'''
[[0.5 0.5 0.5]
 [0.5 1.5 0.5]
 [0.5 2.5 0.5]
 [0.5 3.5 0.5]
 [0.5 4.5 0.5]
 [1.5 0.5 0.5]
 [1.5 1.5 0.5]
 [1.5 2.5 0.5]
 [1.5 3.5 0.5]
 [1.5 4.5 0.5]
 [2.5 0.5 0.5]
 [2.5 1.5 0.5]
 [2.5 2.5 0.5]
 [2.5 3.5 0.5]
 [2.5 4.5 0.5]
 [3.5 0.5 0.5]
 [3.5 1.5 0.5]
 [3.5 2.5 0.5]
 [3.5 3.5 0.5]
 [3.5 4.5 0.5]
 [4.5 0.5 0.5]
 [4.5 1.5 0.5]
 [4.5 2.5 0.5]
 [4.5 3.5 0.5]
 [4.5 4.5 0.5]]
[ 0  1  2  3  4  5  6  7  8  9 10 11 12 13 14 15 16 17 18 19 20 21 22 23
 24]
[ True  True  True  True  True False False False False False False False
 False False False False False False False False False False False False
 False]
'''
使用np.where()函数更加方便
np.where有两种用法
1.np.where(condition,x,y) 当where内有三个参数时,第一个参数表示条件,当条件成立时where方法返回x,当条件不成立时where返回y
2.np.where(condition) 当where内只有一个参数时,那个参数表示条件,当条件成立时,where返回的是每个符合condition条件元素的坐标,返回的是以元组的形式原文链接:https://blog.csdn.net/island1995/article/details/90200151
np.where(pn['pore.left'])[0]
'''
array([0, 1, 2, 3, 4])
'''
np.where()[0] 和 np.where()[1]的具体使用见:https://blog.csdn.net/weixin_38346042/article/details/119181014
简单来说np.where()[0] 表示返回行索引,np.where()[1]表示返回列索引,当condition为一维数组时,np.where()[0] 返回元素索引,np.where()[1] 无法使用
使用布尔数组作为标签的优点之一是,它易于使用布尔逻辑来查找具有标签组合的孔和流道。例如,要找到所有标记了'left'和'top'的孔,我们只需将这些标记数组相乘:
corner_pores = pn['pore.left']*pn['pore.front']
print(np.where(corner_pores)[0])
'''
[0]
'''
The and methods
不同标签之间存在逻辑关系,方便我们查询
或,mode='or'
pn.pores(['left', 'back'],mode='or')
'''
[ 0  1  2  3  4  9 14 19 24]
'''
并,mode='and'
pn.pores(['left', 'back'],mode='and')
'''
[4]
'''
非,mode='nor'
pn.pores(['left', 'back'], mode='nor')
'''
array([ 5,  6,  7,  8, 10, 11, 12, 13, 15, 16, 17, 18, 20, 21, 22, 23])
'''
mode='xor'意思是“检索所有有'左'的'后'的孔,但不能同时检索两者”
pn.pores(['left', 'back'], mode='xor')
'''
array([ 0,  1,  2,  3,  9, 14, 19, 24])
'''
mode='nand'表示“检索只满足一个给定标签的所有孔隙指数”
pn.pores(['left', 'right'], mode='nand')
array([ 0,  1,  2,  3,  4, 20, 21, 22, 23, 24])
mode='xnor',查询具有多个给定标签的孔
pn.pores(['left', 'back'], mode='xnor')
array([4])
自定义标签
用set_label函数可以简单快速的创建新的标签
Ps = Ps = pn.pores(['left', 'front'], mode='and')
pn.set_label(label='corner', pores=Ps)
print(pn.pores('corner'))
'''
[0]
'''
set_label(self, label, pores=None, throats=None, mode='add'):
        r"""
        Creates or updates a label array

        Parameters
        ----------
        label : str
            The label to apply to the specified locations
        pores : array_like
            A list of pore indices or a boolean mask of where given label
            should be added or removed (see ``mode``)
        throats : array_like
            A list of throat indices or a boolean mask of where given label
            should be added or removed (see ``mode``)
        mode : str
            Controls how the labels are handled.  Options are:

            =========== ======================================================
            mode        description
            =========== ======================================================
            'add'       (default) Adds the given label to the specified
                        locations while keeping existing labels

            'overwrite' Removes existing label from all locations before
                        adding the label in the specified locations

            'remove'    Removes the given label from the specified locations
                        leaving the remainder intact

            'purge'     Removes the specified label from the object completely.
                        This ignores the ``pores`` and ``throats`` arguments.

            'clear'     Sets all the labels to ``False`` but does not remove
                        the label array
            =========== ======================================================

        """
使用 @ sytax 读取和写入数据
@ 语法提供了读取和写入标签下的数据的快捷方式。@ 语法也用于定义孔隙网络属性不同的domain,但首先让我们看一下使用 @:
pn['pore.coords@left']
'''
[[0.5 0.5 0.5]
 [0.5 1.5 0.5]
 [0.5 2.5 0.5]
 [0.5 3.5 0.5]
 [0.5 4.5 0.5]]
'''
@ sytax 也可用于写入数据。让我们创建一个 1.0 的数组,然后使用 @ 语法更改它们:
pn['pore.values'] = 1.0
print(pn['pore.values'])
pn['pore.values@left'] = 2.0
print(pn['pore.values'])
pn['pore.values@right'] = [4, 5, 6, 7, 8]
print(pn['pore.values'])
'''
[1. 1. 1. 1. 1. 1. 1. 1. 1. 1. 1. 1. 1. 1. 1. 1. 1. 1. 1. 1. 1. 1. 1. 1.
 1.]
[2. 2. 2. 2. 2. 1. 1. 1. 1. 1. 1. 1. 1. 1. 1. 1. 1. 1. 1. 1. 1. 1. 1. 1.
 1.]
[2. 2. 2. 2. 2. 1. 1. 1. 1. 1. 1. 1. 1. 1. 1. 1. 1. 1. 1. 1. 4. 5. 6. 7.
 8.]
'''
可以创建一个数组并同时为某些位置分配值:
pn['pore.new_array@left'] = 2.0
print(pn['pore.new_array'])
#上行创建了一个空数组,然后把2.0赋值给标记为left的孔中,其他未赋值的孔默认为nan
pn['pore.new_array@front'] = 3.0
print(pn['pore.new_array'])
print(pn['pore.new_array@left'])
'''
[ 2.  2.  2.  2.  2. nan nan nan nan nan nan nan nan nan nan nan nan nan
 nan nan nan nan nan nan nan]
[ 3.  2.  2.  2.  2.  3. nan nan nan nan  3. nan nan nan nan  3. nan nan
 nan nan  3. nan nan nan nan]
[3. 2. 2. 2. 2.]
'''
定义子域
在V2中,定义子域是通过使用2个(或更多)对象来表示每类孔隙来实现的,每个对象都附加了唯一的孔隙尺度模型。在不丢失细节的情况下,只要使用单独的对象来管理每类毛孔(和/或流道)就足够了,但是这给用户和后端的维护带来了很多不便。
在 V3 中,我们开发了一种我们认为更整洁的方法来管理heterogeneous domains(异构域)。现在,您可以直接将所有孔隙尺度模型添加到对象中,而不是创建多个对象。在添加模型时,可以指定一个附加参数:模型适用的参数(即孔或流道参数),如下所示:
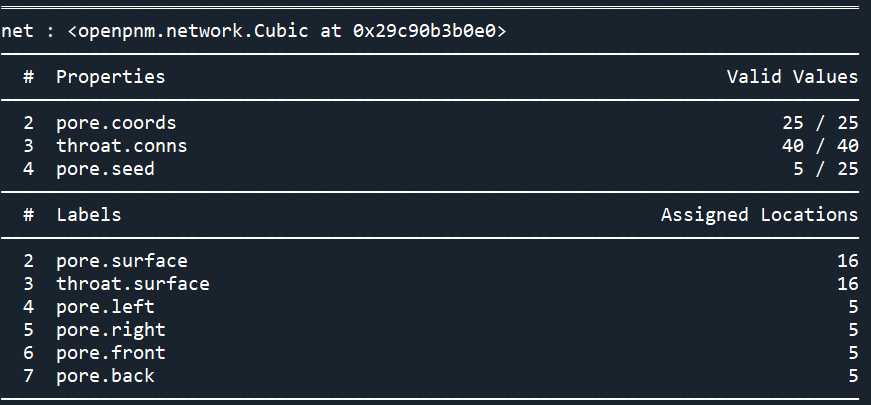
pn.add_model(propname='pore.seed',
             model=op.models.geometry.pore_seed.random,
             domain='left',
             seed=0,
             num_range=[0.1, 0.5])

add_model(self, propname, model, domain='all', regen_mode='normal',**kwargs):
        """
        Add a pore-scale model to the object, along with the desired arguments

        Parameters
        ----------
        propname : str
            The name of the property being computed. E.g. if
            ``propname='pore.diameter'`` then the computed results will be stored
            in ``obj['pore.diameter']``.
        model : function handle
            The function that produces the values
        domain : str
            The label indicating the locations in which results generated by
            ``model`` should be stored. See `Notes` for more details.
        regen_mode : str
            How the model should be regenerated. Options are:

            ============ =====================================================
            regen_mode   description
            ============ =====================================================
            normal       (default) The model is run immediately upon being
                         added, and is also run each time ``regenerate_models``
                         is called.
            deferred     The model is NOT run when added, but is run each time
                         ``regenerate_models`` is called. This is useful for
                         models that depend on other data that may not exist
                         yet.
            constant     The model is run immediately upon being added, but is
                         is not run when ``regenerate_models`` is called,
                         effectively turning the property into a constant.
            ============ =====================================================

        kwargs : keyword arguments
            All additional keyword arguments are passed on to the model

        Notes
        -----
        The ``domain`` argument dictates where the results of ``model`` should
        be stored. For instance, given ``propname='pore.diameter'`` and
        ``domain='left'`` then when `model` is run, the results are stored in
        in the pores labelled left. Note that if ``model`` returns ``Np``
        values, then values not belonging to ``'pore.left'`` are discarded.
        The following steps outline the process:

        1. Find the pore indices:

        .. code-block:: python

          Ps = obj.pores('left')

        2. Run the model:

        .. code-block:: python

          vals = model(**kwargs)

        3. If the model returns a full Np-length array, then extract the
        correct values and apply them to the corresponding locations:

        .. code-block:: python

          if len(vals) == obj.Np:
              obj['pore.diameter'][Ps] = vals[Ps]

        4. If the model was designed to return only the subset of values then:

        .. code-block:: python

          if len(vals) == obj.num_pores('left'):
              obj['pore.diameter'][Ps] = vals

        """
给定已在网络上定义的标签:domain='left'
着要创建异构模型,只需记住每个域孔隙和/或流道的标签,然后在添加模型时传递这些标签。也可以保留未指定的标签(),这意味着模型应用于整个网络。对于上述情况,我们可以看到该模型是针对 5 个位置计算的(对应于left的 5 个孔):
当我们考虑将具有不同参数的模型应用于组不同的孔隙时,这种方法的作用确实是显而易见的:
pn.add_model(propname='pore.seed',
model=op.models.geometry.pore_seed.random,
domain='right',
seed=0,
num_range=[0.5, 0.9])
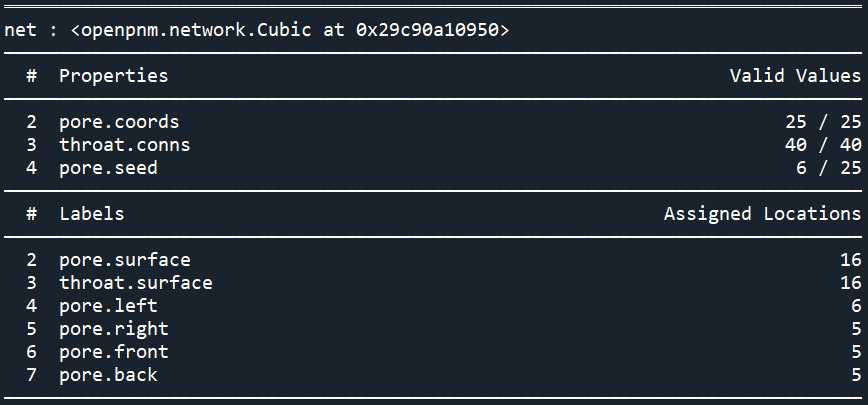
#现在,这些值存在于 10 个位置。pore.seed'
print(pn)
这种新方法是通过改变孔隙尺度模型在对象上的储存方式来实现的,每个对象都有一个属性,并和要计算的属性一一对应,因此对象存储的值是由模型(model)来计算的,新的方法可以存储同一对象上不同位置的多个模型。这可以通过打印模型属性在下面看到:
print(pn.models)
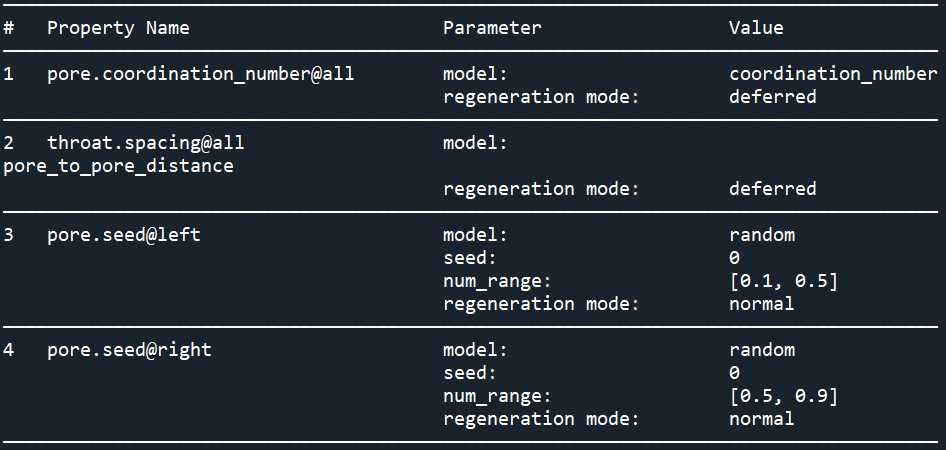
添加的一个模型名将创建一个唯一的字典键。OpenPNM可以识别其中的模型计算值,并将每个函数的输出引导到正确的位置
定义和更改子域位置
更改子域位置只要更改标签下的属性即可
pn.pores('left')
#array([0, 1, 2, 3, 4])
pn['pore.left'][[4, 5]] = True
del pn['pore.seed']
pn.run_model('pore.seed@left')
print(pn)
混合完整域和子域模型
#首先删除上面应用的各个模型,并将它们替换为在所有位置上应用统一值的单个模型,然后将两个不同的正态分布应用于 'left' 和 'right'
del pn.models['pore.seed@left']
del pn.models['pore.seed@right']
pn.add_model(propname='pore.seed',
model=op.models.geometry.pore_seed.random)
pn.add_model(propname='pore.diameter',
model=op.models.geometry.pore_size.normal,
domain='left',
scale=0.1,
loc=1,
seeds='pore.seed')
pn.add_model(propname='pore.diameter',
model=op.models.geometry.pore_size.normal,
domain='right',
scale=2,
loc=10,
seeds='pore.seed')
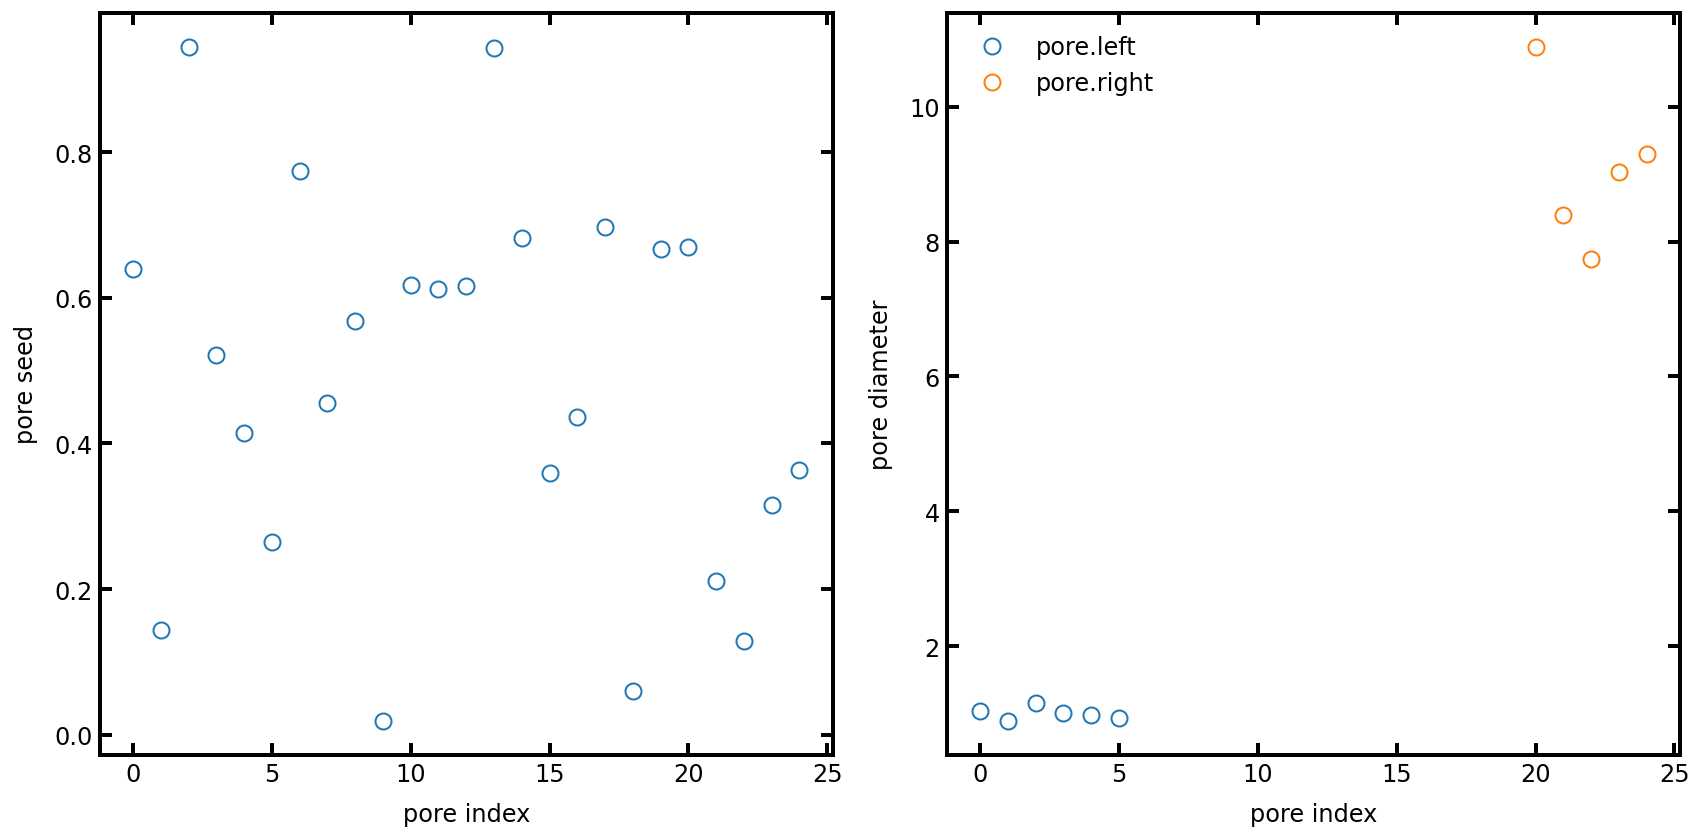
import matplotlib.pyplot as plt
fig, ax = plt.subplots(1, 2, figsize=[12, 6])
ax[0].plot(pn.Ps, pn['pore.seed'], 'o')
ax[0].set_ylabel('pore seed')
ax[0].set_xlabel('pore index')
ax[1].plot(pn.pores('left'), pn['pore.diameter@left'], 'o', label='pore.left')
ax[1].plot(pn.pores('right'), pn['pore.diameter@right'], 'o', label='pore.right')
ax[1].set_ylabel('pore diameter')
ax[1].set_xlabel('pore index')
ax[1].legend();
如下图所示,'pore.seed'值均匀分布在所有位置,,但由于每个模型中的孔径因为使用的参数'pore.seed'不同而有所不同。
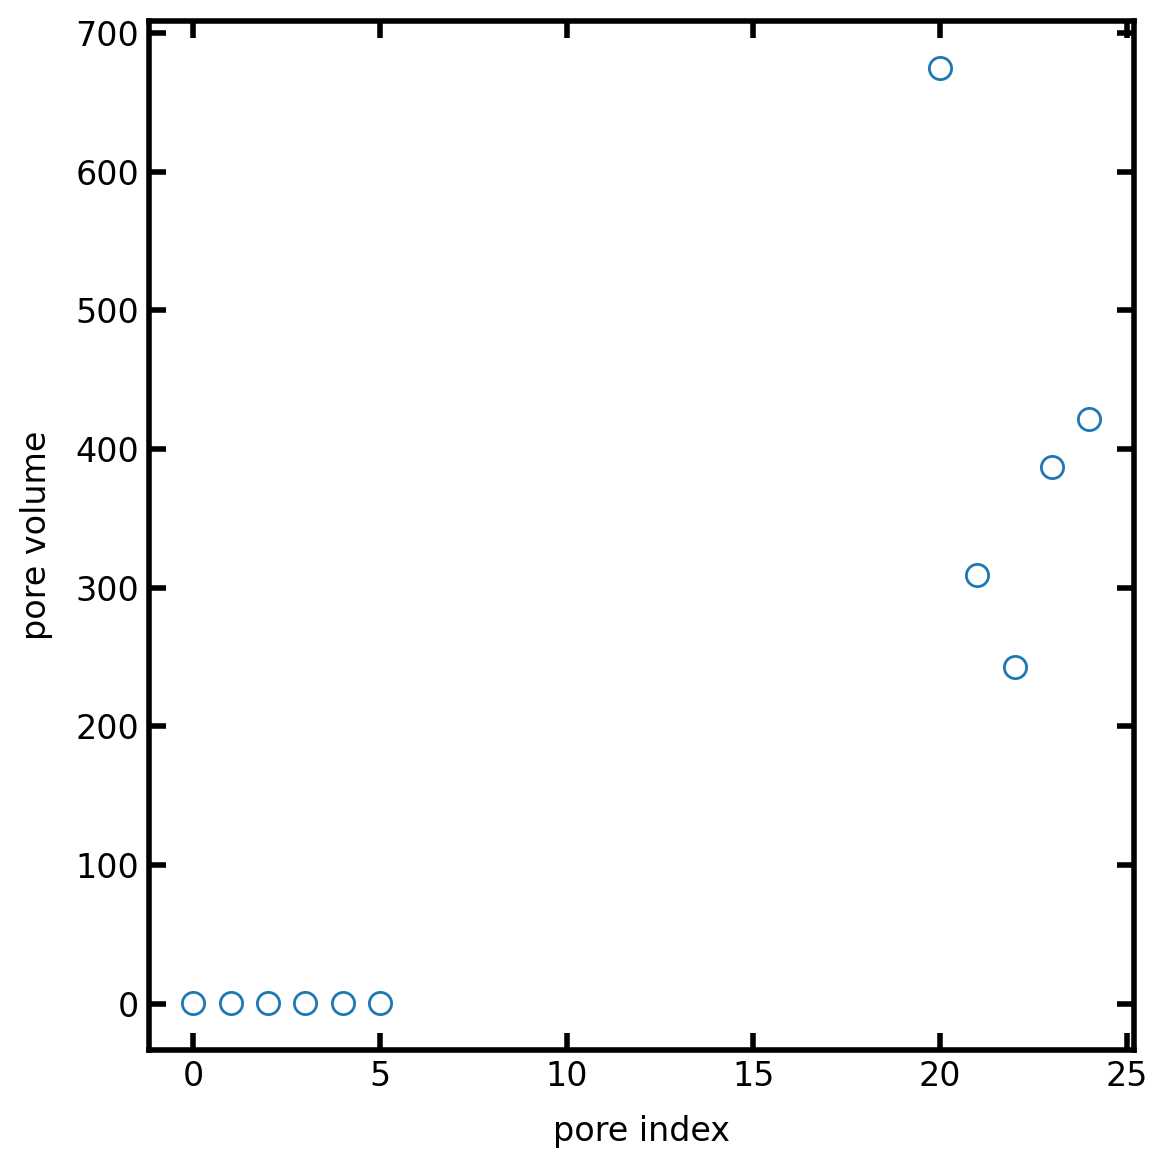
现在,我们可以将一个模型应用到整个域,使用每个域唯一计算的孔径值来计算孔隙体积:
pn.add_model(propname='pore.volume',
             model=op.models.geometry.pore_volume.sphere)
import matplotlib.pyplot as plt
fig, ax = plt.subplots(1, 1, figsize=[6, 6])

ax.plot(pn.Ps, pn['pore.volume'], 'o')
ax.set_ylabel('pore volume')
ax.set_xlabel('pore index');
混合许多不同形状的子域
可以定义具有不同形状的多个子域,并将模型应用于每个子域,即便子域之间可能会相互重叠
Ps = pn.pores(['front', 'back'])
Ts = pn.find_neighbor_throats(Ps, asmask=True)
pn['throat.front'] = Ts
pn['throat.back'] = ~Ts
pn.add_model(propname='throat.diameter',
             model=op.models.geometry.throat_size.from_neighbor_pores,
             domain='front',
             mode='min')
pn.add_model(propname='throat.diameter',
             model=op.models.geometry.throat_size.from_neighbor_pores,
             domain='back',
             mode='max')
#Now we can see that the throat diameters have beed added to the network:

print(pn)
Comments NOTHING